 Although there was a time when wood wall paneling was synonymous with dated décor, those days are fading fast. Real wood panels, parquet, and three-dimensional wall coverings are currently making a comeback in the design world. Forget cheap faux wood laminates and shag carpet. Today’s real wood wall coverings are chic and modern, using all-natural hardwoods to create classy, upscale interiors.
Plus, as many modern wood wall panels are designed for self-installation, you don’t have to spend a fortune on installation to achieve that upscale look. The following is a brief guide to installing wood panel walls, as well as some design ideas to help spark your imagination.
Pre-Installation
It is recommended that wood wall panels be installed in climate controlled interior environments with humidity and temperature controls. As with any natural wood product, be sure to acclimate the wood to the environment where it will be installed. Stack wood panels in alternating rows and allow them to acclimate for one week.
If you are preparing to install wood panels in a newly constructed space, use plywood for the walls instead of drywall. This will ensure a smoother installation process and prevent damage should you choose to remove the panels later on.
If you intend to install panels on an existing wall you have two options: If you don’t want to construct a new wall, you will first need to clean the walls. Wipe down papered or painted walls thoroughly. If the wall is coated with glossy paint, rough the surface with sandpaper to improve the grip of the adhesive. When all walls are thoroughly cleaned and prepped, apply a coat of primer, just as you would if you were about to paint.
Installation on drywall surfaces presents a slight challenge, as removing panels fixed to drywall with an adhesive will effectively destroy the drywall. It is therefore recommended that you avoid applying adhesives directly. This option is using just pin nails to fasten your panels. However, depending on the pattern and wood species it may require puttying to hide the nails. Alternatively, fastening a substrate, such as thin sheets of plywood, to the drywall can provide a surface that can take an adhesive. Furring strips – long, thin lengths of wood – can also serve as a substrate, and are available at most hardware stores. Placement of furring strips should be based on the pattern and size of the wood panels.
Installation
When the primer is dry, you are ready to begin installing your wood panels. Consider your focal point, the floor or ceiling, and start there. Work bottom to top or top to bottom to create horizontal panel “columns.” Using a 1/8-inch notch trowel, apply a layer of adhesive to the wall where the first panel will go. Set the panel in place and apply medium pressure. Drive pin nails into each of the panels to secure it. A pin nailer will speed up the process and help prevent damage to the panels. Repeat these steps until there is less than one panel’s width to the corner.
Unless you’re extraordinarily meticulous (or extraordinarily lucky), you’ll need to cut some wall panels to fit snuggly into the corners. To do this, measure the distance from the last installed panel to the corner of the wall. Using a table saw, cut the final panel in the row to size. It is recommended that you measure and cut panels one row at a time. Though it may be tempting to cut all the corner panels at once and to one measurement, this will only work if your walls are straight and the distance to the corner is consistent from top to bottom. If your walls are slightly crooked, the distance to the corner at the bottom might be wider than that at the top, or vice versa. This will create unsightly gaps.
Fire Safety
Wood is a naturally combustible material. You should, therefore, be aware that adding layers of wood to your space can increase the risk of fire. It is recommended that you avoid installing wood panels near any heat source. To minimize the risk of fire, you can treat panels with a fire retardant spray. While coating panels does not render them fireproof – they are wood, after all – it can reduce the possibility that a fire will start and/or spread. If you have doubts or questions, contact your local fire department for more information.
Design
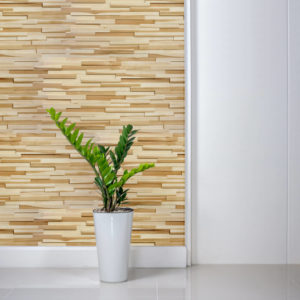
 Single Wall Coverings
 Single Wall Coverings
Paneling need not be applied to all the walls in a space. In fact, there are instances where this may be overkill. Covering one wall with dynamic, wood panels and offsetting that with simple painted or papered walls on either side can work well, particularly in smaller, enclosed spaces.
Stairways are another area rife with possibility. Though we may not be conscious of it, we tend to look straight ahead as we climb or descend staircases. The walls above staircase landings are the perfect place for visually-engaging wood panels.
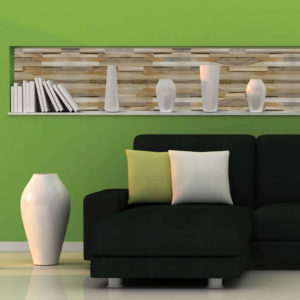
Partial Coverings
If you like the idea of wood wall coverings but don’t want to commit to paneling an entire wall, a partial wall covering might be just the thing. This can be a great way to transform an otherwise unremarkable area into a dynamic focal point. Wood panels can make ordinary pillars, kitchen islands, and focal points pop. Focal points such as windows or mirrors can be accented with a border of panels much the same way a picture is enhanced with a well-chosen frame.
More subtle applications can also be effective. Placing wood panels along the interior of niches or recessed shelves can create dazzling contrast with the flat walls they’re built into.
Flooring On Walls
One ingenious way to create visual interest on your walls is to decorate them with wood flooring materials. Most strip, plank, or parquet flooring can be adapted for vertical installation. Not only is this eye-catching, but it can create visual unity as well. The time-tested design concept of repeating motifs can be used to tie spaces together and create harmony between floors and walls. Seeing a wood tile pattern repeated on the walls will not only create a conversation piece but will also help draw the eye around the room.
If you like this idea for wall décor but have no intention of redoing your floors, consider custom work. Designers can work with you to replicate the same materials and style of your current flooring for adaptation to your walls. The wood professionals at Oshkosh Designs will work with you to custom-craft any design concept you can imagine.
Talk to the Pros
When it comes to wood wall designs, your only limitations are your imagination and your budget. Browse the internet and our online gallery for ideas to get your creativity flowing. And as always, consult with woodworking professionals. The experienced artisans at Oshkosh Designs can address any questions or concerns you may have and will help to ensure that your wood wall project is an exciting one-of-a-kind.

Address
911 E. Main Street | Winneconne, WI 54986
Hours
Monday – Friday 8:00am - 4:30pm CST
Phone 920-582-9977
Toll-free 877-582-9977


Address
911 E. Main Street | Winneconne, WI 54986
Hours
Monday – Friday 7:30am - 4:30pm CST
Phone 920-582-9977
Toll-free 877-582-9977