 Border designs can serve to define a space, accentuate elements within a room, and generate visual flow. Adding a floor border is an excellent way to bring out the natural beauty of your room and add that little extra something that will make your space memorable. To get the most out of your border inlay, here are some tips for the effective placement of this versatile accent piece.
Pre-Planning
Before you install your border, and even before you purchase it, there are a few planning steps that will help you to feel prepared and confident when it comes time to get out the power tools.
(For more pre-installation tips, see this article on choosing and placing medallions.)
Measure the Walls
This first may seem obvious, but it bears mention. Getting room dimensions is important for determining not only how much border inlay you’ll need, but also effective placement. Though a room may appear symmetrical, precise measurement may reveal that one wall is slightly longer than another. Knowing this ahead of time will help with the planning and save you quite a bit of head-scratching down the road.
Determine the Focal Point

Every room has a point where our eyes are naturally drawn when we enter. This may be a feature of the space, such as a window or a fireplace, or just a point on a wall. Find this spot. If you’re having trouble, ask family and friends what they see first when they enter the room.
Why is this important? This is the point in the room where your border must look its best. After all, it’s the first thing people will see. As you plan your border placement, check this spot regularly to see how things look.
Determine Width
Some border inlays are manufactured in fixed widths, though many manufacturers can also customize if you know you want something wider or narrower than a standard size. If you’re uncertain and are having trouble visualizing what you want, cut strips of paper into several widths and lay them on the floor at the focal point. Step back to where you normally enter the room to help choose what looks best.
If you have strip or plank flooring, be sure to consider the width of these materials when determining the optimal width for your border. Narrow borders tend to look best with narrow boards. Start with a border that is about the width of two strips. In smaller rooms, avoid overly wide borders. These tend to make the space feel cramped.
Create a Mock-Up
Putting down a temporary “test” border before cutting into the floor can help you to determine the best placement for your border and will also allow you to tinker with ideas easily. (More on this below.)
Lay down parallel strips of painter’s tape or lengths of wrapping paper cut to the appropriate width. Start with the wall along the focal point. Move the strips around until you are satisfied, then take measurements to determine where the rest of the strips should go.
While this step may seem tedious, it will help to ensure that what you install matches what you see in your mind’s eye. You may find that once the mock-up is laid out throughout the entire room that the border is too narrow or too close to the center of the room. Seeing everything in place may also inspire ideas that hadn’t occurred to you before. Figuring this out ahead of time will save both cost and headaches later on.
Avoid Small Fragments
Another issue that can be resolved in the mock-up stage is the consideration of flooring fragments. If you have strip flooring, tile, or parquet, you must consider the intersection of the border strip and the individual flooring pieces. Leaving tiny slivers of plank or tile parallel to the inlay can be visually distracting and also create problems with installation.
When determining placement, try to leave at least fifty percent of the width of your flooring material intact. If you have strip or plank flooring that runs diagonally, avoiding small pieces may be difficult or impossible. In this case, do your best to minimize the number of tiny pieces that abut the border. Your goal should be to avoid calling attention to the installation by maximizing the appearance of uniformity.
When you are happy with the way the mock-up looks, you’re ready to order your materials.
Additional Tips
There are of course no hard and fast rules for where a border will look best. A lot will depend on your space, your border design, furnishings in the room, and your taste. That said, here are some border design ideas and additional items to consider when planning your design.
Conventional Placement

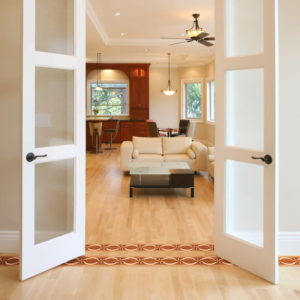
Most borders look best not flush to the wall but set at a slight distance from it, leaving a skirt of plain floor between wall and border. The border then follows the contours of the walls and any features that protrude into the room, such as fireplaces or steps. If you choose to follow this time-tested plan, determine the distance from the wall in the mock-up stage and maintain that same distance from all walls and contours in the room.
Again, the precise width of this skirt will depend on your room and your taste, though leaving a space roughly the width of the border is a good place to start. What’s important is that, once you determine this width, you maintain it consistently, especially along parallel walls. Deviating will likely prove distracting.
When installed, the border should appear neither to crowd the walls nor encroach on the main floor space. It should frame the main space and trace the shape of the room in a continuous, flowing line.
Symmetry and Crooked Walls
Advice for Crooked Walls
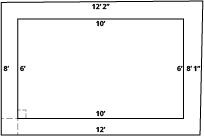
An exception to consistent skirt width can be made for spaces that appear symmetrical, such as rectangular rooms, but that are actually slightly askew. Again, this is why careful measurements are essential. If you follow the exact line of each wall, you may end up drawing attention to the asymmetry with a border that appears crooked.
To correct for this, start with a right angle equidistant from the intersection of the two truest walls. Use this, then, to draw a true rectangle (or your chosen shape) on the floor. See illustration for example.
If the rectangular border is straight and symmetrical, the crooked walls shouldn’t be noticeable. Double check that everything looks right at the focal point and from all entryways.
Framing a Space
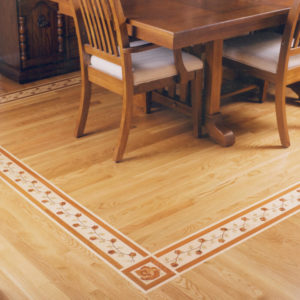 Another effective way to place a border inlay is to use it to define a specific space. Instead of following the contours of a wall, the border can serve to offset, say, a dining area in an open floor plan. This can be particularly striking if a different flooring material or a medallion is set down within this space.
If you intend to place furniture inside this area, set the furniture where you envision it during the mock-up stage. Leaving a little extra space can help avoid visual clutter.
Visual Flow
Borders can be a great way to create unity and movement between adjacent spaces, such as between a living room and a hall. If the hall is too narrow to maintain the same wall-to-border skirt, it shouldn’t be terribly distracting to reduce the distance from the wall in this narrower space.
If, on the other hand, you wish these adjacent spaces to appear discrete, separating them with a border line can create this effect as well.
Lay It Out
Once you’ve got your border and it’s been properly acclimated, you may be tempted to dive right into the installation. However, a little patience at this point can save you years of frustration and annoyance later on.
Before you begin routing, lay the border out just like you did the mock-up. If there are repeating patterns, ensure that these are spaced as evenly as possible. With wood borders, there will be slight natural color variations, so dry fit all connecting sections for the best color match. Make cuts as needed. When everything appears as it should, let the border sit for at least twenty-four hours. Give yourself plenty of time to pick out anything that might need to be adjusted. Be on the lookout for “that one spot that drives you crazy.”
If you’ve gone at least a day and everything still looks great, then you’re ready for installation.
Throw Out the Formula
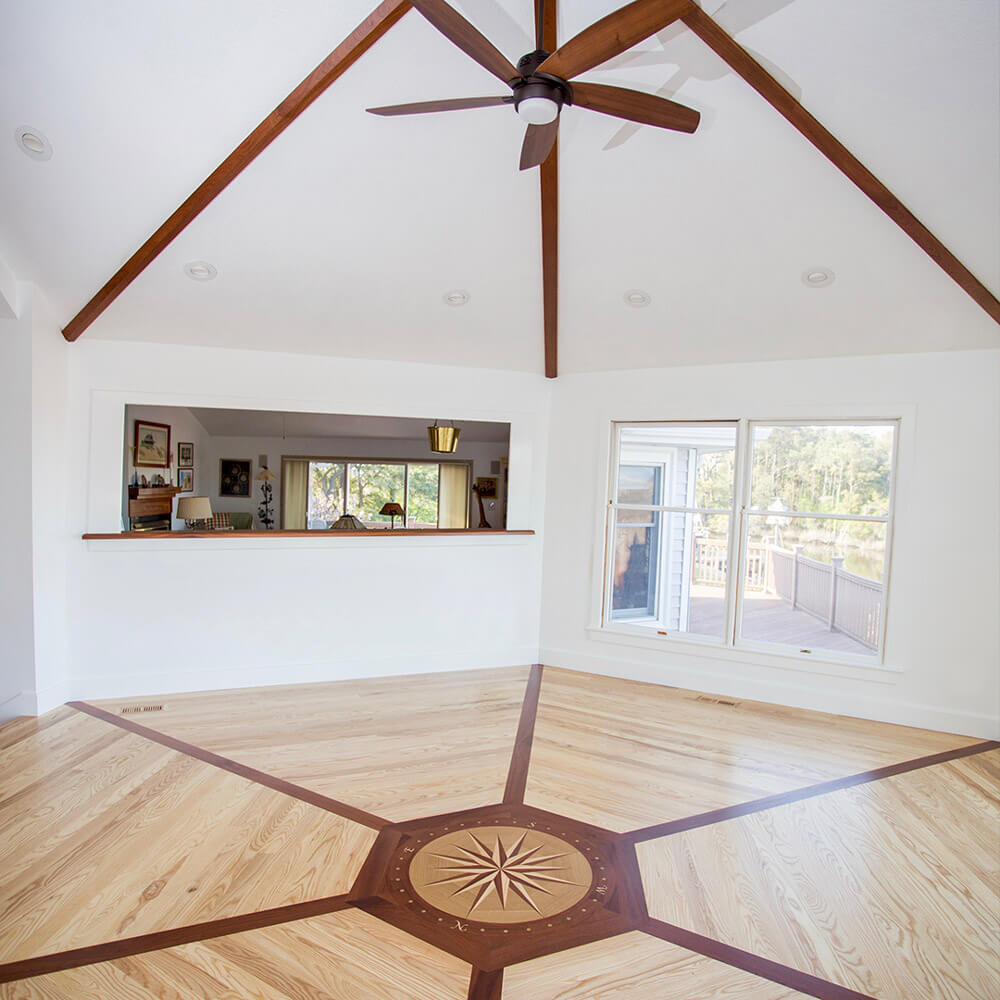
The most attractive floor borders always feel natural to their space. A simple, rectangular border may look inspired in one room and awkward in another. Take note of the visual elements of your space and experiment with interesting ways to frame them. Arcs surrounding entryways, for example, often appear welcoming. The monotony of a long, straight wall can be broken up with waves, arcs, or well-placed focal accent inlays. Border corner inlay can generate the appearance of refinement and completion.
For inspiration, be sure to look at our border photo gallery. And of course, consult with a reputable vendor. The flooring professionals at Oshkosh Designs can provide you with design suggestions, catalogs, and other resources to prime your imagination. And we are always available to answer whatever questions may come up along the way.
All this will help you to choose and place a memorable border inlay that is unique to you and your space.

Address
911 E. Main Street | Winneconne, WI 54986
Hours
Monday – Friday 7:30am - 4:30pm CST
Phone 920-582-9977
Toll-free 877-582-9977
Address
911 E. Main Street | Winneconne, WI 54986
Hours
Monday – Friday 8:00am - 4:30pm CST
Phone 920-582-9977
Toll-free 877-582-9977

