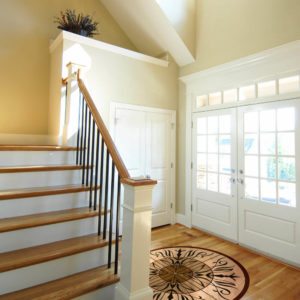
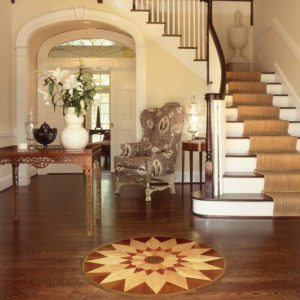
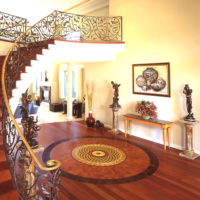
Medallions are striking, memorable accent pieces. Though wood, stone, and mixed-media medallions can serve as standalone works of art, they’re designed to be fitted into floors. Not only are they attractive in their own right, they can also serve to complement and enhance the design of a space by creating unity and flow. A well-placed medallion in a foyer, for example, can create an arresting first impression in an otherwise unremarkable space.
Since it is a more or less permanent feature, however, care must be taken to ensure that the medallion is placed to the greatest possible effect. No homeowner wants to rout out a hole in their floor only to find that the medallion looks “off.” Some simple preparation can ensure that your medallion indeed serves to enhance the look of the space.
Choose a Design
If you’re unsure what you’d like highlighted, snap a few pictures of your space. Then look at them when you’re away from the room. Which elements do you notice first? What color are they? What are they made of? What species of wood was used for the floors and trim? Were other materials used, such as metal or stone?
Look for medallion designs with coordinating tones and materials to help to show off these notable elements. It helps to look at lots of pictures to see how others have used medallions to enhance the look of their space.
Place Furniture
Arrange your furniture where it will eventually go. If you’re the type who likes to change things up every couple of years, move the furniture anywhere you think it might go later. If you envision upgrading couches or coffee tables, estimate how big you might plan to go and factor that in as well. Then mark off these spaces on the floor with painters’ tape.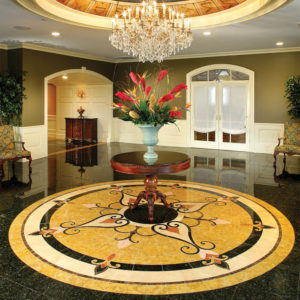 If couches or chairs will be in the room, remember that you need a place for your feet to go. There’s nothing inherently wrong with having part of your medallion underfoot, provided this is what you want. In some instances, medallions can be very attractive placed under tables and chairs. Just keep in mind, though, that it may be hard to fully appreciate a piece of decorative artwork if it is not fully visible.
If you’re building or remodeling, furniture may not yet be in place. In this case, measure your existing furniture and mark off the spaces where each piece will eventually go. This will ensure that you’re not covering the medallion or creating a space that is visually cluttered. This process can be made easier if you have access to floorplans. Drawing in the medallion can aid in visualizing how the placement will fit with the overall design of the room. Just make sure that the medallion you’re drawing on the plan is to scale, and that you factor in ceiling fixtures (see below).
When in Doubt, Center It
If you love the idea of a medallion but aren’t sure where it should go, putting it in the center of a room is usually a sure bet. Symmetry is aesthetically pleasing, and accenting the center point can help tie the room together. This is especially true for large spaces.
To find the center of a rectangular room, measure one of the shorter walls. Find the center point of the wall and mark it with chalk or painters’ tape. Do the same for the wall opposite. Use a chalk line or a laser plumb and draw a line between the two points. Repeat the process using the center points of the longer two walls. The point where the two lines intersect is the center of the room.
Matters get a little more complicated when the room is asymmetrical. When a hallway, an entryway, or another open-plan room sits adjacent to the space, there is no exact center. The key, then, is to imagine the area as a discrete rectangular space and then find its visual center. This may sound like guesswork, but in fact, it can be determined methodically once the space is defined.
To do this, draw a perimeter with chalk or painters’ tape. Starting in a corner and using the wall as a guideline, extend the line of the wall through any open spaces right up to the wall opposite. Repeat this step for any walls that do not extend the length of the space. You will end up with a rectangle on the floor that defines the room visually, if not with actual physical borders. Once this perimeter is established, use the above steps for finding the center of the rectangle.
Account for Ceiling Fixtures
When thinking about where to place a visual feature on the floor, it can be easy to neglect the features of the ceiling. These will affect how you perceive the floor. Chandeliers, ceiling fans, and swag lamps tend to draw the eye up and down from their location. You might place your medallion in the dead center of a room, but if you have a chandelier that is not also perfectly centered, that discrepancy will make the medallion appear to be misplaced. To correct for this, try aligning the medallion with the center of the fixture. Use a plumb line for accuracy.
Placement Should Appear Intentional
If you choose not to center the medallion, make sure that it looks deliberate. A medallion that is only just slightly off from the visual center of a space will look like a mistake. However, if it’s clear that the medallion was never intended to be at the center point, the asymmetry won’t be distracting. If, for example, one end of a room appears bare while the other full, a medallion can go a long way to help balance that out. The key is to create visual harmony. The parts should fit with the whole so that each element of the room appears to be in its proper place.
Determine the Size
Once you find a design that you like, you must determine the size. A simple way to do this is by marking off an area of floor with a length of rope. Shrink or expand the area as you see fit. When you think you have it right, trace that space with chalk or painters’ tape. Then leave the room and come back a few hours later, just to make sure you’ve got it right.
Though this is not a hard and fast rule, it is generally a good idea to surround the medallion with an area of blank flooring left uncovered by furniture or features. This will prevent the appearance that furniture is encroaching on the medallion, thus making the room look crowded. Leaving a rim of blank space can also serve to frame the piece and bring out its beauty much the way a mat around a photograph does. How much space to leave is, of course, subjective and will depend on your medallion, your room, and your taste. Start with a blank space that is 20 percent of the diameter of the medallion and then adjust according to your preferences.
When you have the right size diameter and design determined, purchase your medallion accordingly.
Set It Up
Once you’ve purchased your medallion and decided where it should go, you may be tempted to install it immediately. However, don’t go cutting into your floor just yet. Given that this will become a permanent feature of your space, the old adage “measure twice, cut once” should be taken seriously.
This may seem obvious, but it bears mention. When you have the medallion, place it on the floor where you think it should go. If there are multiple pieces, arrange them as they will eventually fit together. When you’re happy with the placement, leave the piece there for at least 24 hours. Remember that the light in the room will change throughout the day, which will greatly affect your perceptions. While you may be in love with the placement of the medallion in dim lamplight, you may be less thrilled when it’s blasted with sunlight or covered by an unflattering shadow. Best to find that out before it’s permanently installed.
Work with a Reputable Vendor
Finally, as medallions are strictly decorative, setting the right product in the right place is essential. There is no greater resource for this than the manufacturers themselves. They should have plenty of experience helping customers. They can advise you on how your medallion will age (many wood species, for example, darken over time) and how to care for it. Some manufactures provide a drawing for a fee that you could then printout to actual size. A good vendor will work with you to ensure that you’ve chosen a design that fits your exact specifications, one that you’re pleased with for years to come.
Source:
National Wood Flooring Association. “Ornamental Floors: Design and Installation.” National Wood Flooring Association Technical Publication, 3rd ed., no. B300. National Wood Flooring Association, 2015, Chesterfield, Missouri.

Address
911 E. Main Street | Winneconne, WI 54986
Hours
Monday – Friday 7:30am - 4:30pm CST
Phone 920-582-9977
Toll-free 877-582-9977
Address
911 E. Main Street | Winneconne, WI 54986
Hours
Monday – Friday 8:00am - 4:30pm CST
Phone 920-582-9977
Toll-free 877-582-9977

